There are many methods of showcasing your jigsaw puzzle after finishing it. Prior to framing or hanging your creation however we need to make sure it won’t fall apart! Using glue has been one of the most time-tested techniques to accomplish this.
A glue with a low water content is ideal for use on puzzles. Glue that has too much water content will seep into the individual pieces swelling and distorting them. This is a common problem.
There are some versions of dry or powder glue available however we do not recommend them.
Avoid overuse of whatever glue is chosen. While you will want to be complete in coverage, keep it on the working surface of the puzzle and avoid it gathering along the exposed sides. By saturating the puzzle even low water content glues can have the same affect as using the wrong type of glue.
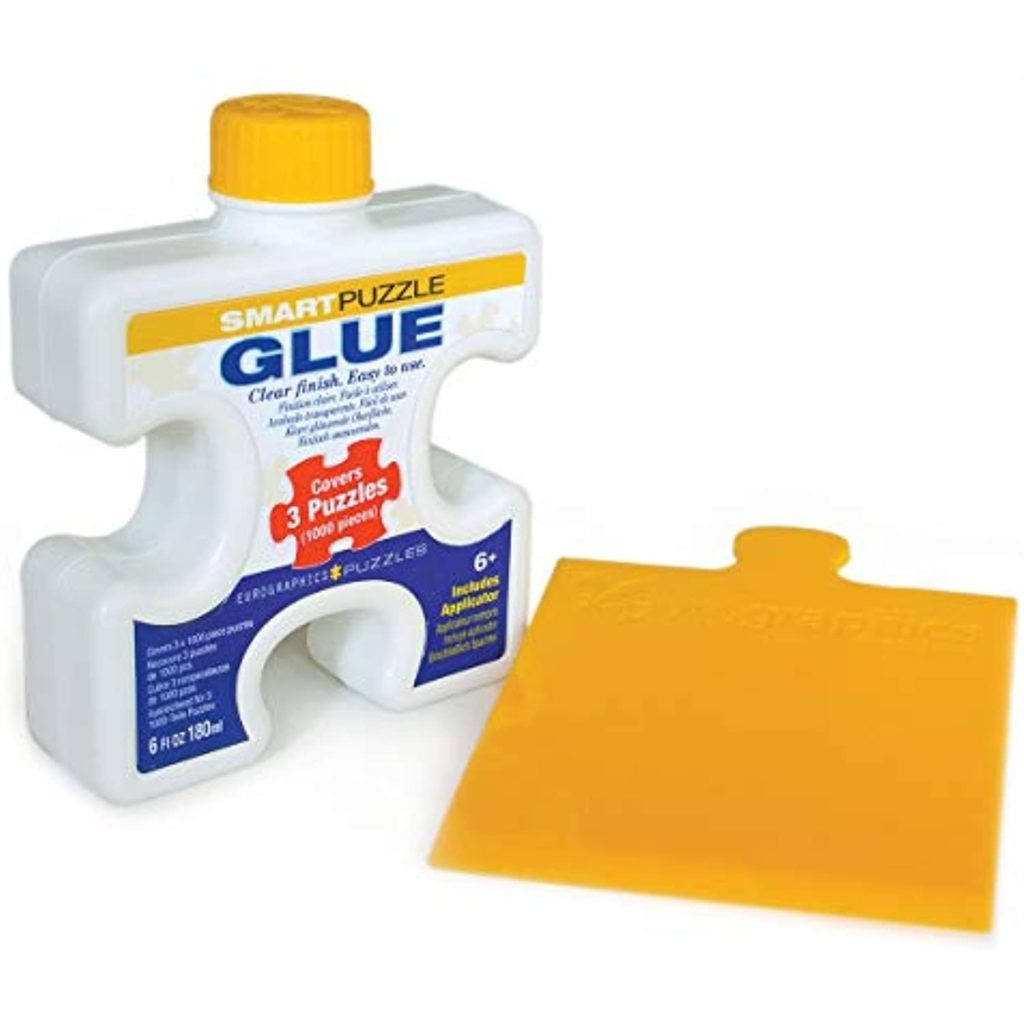
An acid-free variety of glue will dramatically help in preserving your puzzle long term. The acid in most glues will cause discoloration and breakdown of the fibers it was supposed to keep together. Commercial glues designed for jigsaw puzzles are specifically created to avoid this. One example of this is Eurographics Smart-Puzzle Glue.
Mod Podge has been a favorite of crafters for years. Most formulas of Mod Podge however do have some acid content. There are two versions we recommend you consider if you want to use this product. There is a Puzzle Saver Formula and a Paper Formula that has a blue label. While we cannot confirm the Puzzle Saver is acid-free, the Paper Formula states it right on the bottle.
Prior to application of glue, slide pieces of wax paper under the puzzle and leave several inches around the border. This is to protect what is under the puzzle and will not be part of what helps to hold it together. We will talk about potential backing for your puzzle in another post.
Using a dry lint free cloth gently wipe your puzzle’s face to remove dust, lint, hair, or anything else that could have found its way onto the surface. Do not use any cleaner, water, or polish as this will influence the glues ability to cling along with creating artifacts that may show up after the glue dried.
Prior to applying glue to your puzzle run a rolling pin over it in several directions to ensure all pieces are laying entirely flat. This preparation will pay dividends later. It is extremely easy to miss a piece or several that are not entirely flat.
When applying the glue to the puzzle do not be stingy as it needs to cover every single gap. Many commercial puzzle glues come with a plastic spreader, however if you do not have one, a credit card will do. Avoid using a brush to spread the glue as it tends to leave brush marks. Foam brushes are better in this regard; however, they will tend to pull glue off the top of the gaps between pieces where we want it to be.
On a good glue application, you should see it showing on all the gaps between pieces. Do not be concerned by seeing all the glue covering the face of the pieces. So long as you did a good job spreading it out, it will dry clear. Just avoid leaving any globs.
While manufacturers may give guidance that your puzzle can be moved within a few hours. We prefer to allow a full 24 hours of not moving the puzzle to ensure the entire puzzle has completely dried. A little overboard maybe, but we’ve had good success with this.
Once dry a spatula or ruler can be used to separate the wax paper from the back of the puzzle. If you find that there was movement and separation on some pieces just reset the puzzle and re glue that area. Additionally, if you find some pieces moved out of alignment use the rolling pin again to reset it flat prior to reglueing.
Framing and wall hanging are now possible with some preparation work. Look for these time-tested techniques in our next post.